
| 일 | 월 | 화 | 수 | 목 | 금 | 토 |
|---|---|---|---|---|---|---|
| 1 | 2 | 3 | ||||
| 4 | 5 | 6 | 7 | 8 | 9 | 10 |
| 11 | 12 | 13 | 14 | 15 | 16 | 17 |
| 18 | 19 | 20 | 21 | 22 | 23 | 24 |
| 25 | 26 | 27 | 28 | 29 | 30 | 31 |
- c3 축 가리기
- snmp
- 정규식 컴파일
- CentOS7
- c3 second
- 정규식 활용
- 정규식 문자열 출력
- linux시간으로 변경
- c3 초
- python os
- grafana dashboard
- g++ 업데이트
- 1697
- regex_search
- python subprocess
- python popen
- influxdb 설치
- semanage
- 백준
- InfluxDB
- telegraf
- gcc regex
- subporcess path
- centos pyhon 설치
- c3 축 없애기
- c3 step graph
- selinux port 등록
- c++ 정규식
- gcc 업데이트
- snmp test
- Today
- Total
리셋 되지 말자
[nodejs 교과서] 2장-알아두어야할 자바스크립트 (2-1 ES2015+) 본문
ES2015+
var 대신 const, let
if(true){
    var x = 3;
}
console.log(x); //3

if (true){
    const y = 3;
}
console.log(y); //Uncaught ReferenceError: y is no defined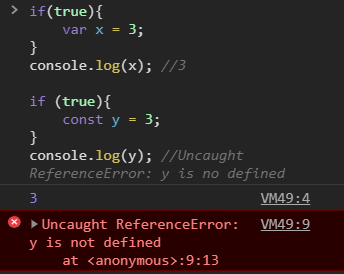
var은 함수 scope이고, const와 let은 블록 scope이다. 블록 scope인 y에는 블록 밖에서 접근을 할 수가 없으므로 에러
const와 let은 block scope, var은 function scope
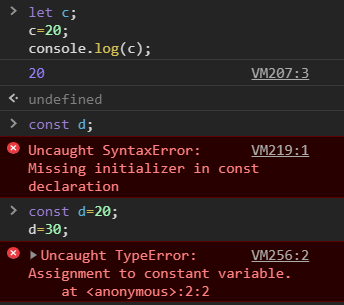
const와 let의 차이
- const
const는 타 언어와 비슷하게 한번 값을 초기화하면 다른 값을 대입할 수 없다.
또한 선언할 때, 값으로 초기화 해주어야 한다.
- let
let은 다른 값을 대입할 수 있다.
선언할 때, 초기화 해주지 않아도 된다.
템플릿 문자열
백틱( ` )을 사용한 문자열 (TAB키 위에 있는 따옴표 같은 거)
- 기존의 문자열
var num1=1;
var num2=2;
var sum=num1+num2;
var string1=num1 + ' 더하기 ' + num2 + ' 는 ' + sum;
console.log(string1); // 1 더하기 2 는 3- ES2015부터 사용이 가능한 문자열
var num1=1;
var num2=2;
var sum=num1+num2;
var string = `${num1} 더하기 ${num2} 는 ${sum}`;
console.log(string); // 1 더하기 2 는 3
${변수} 형식으로 변수를 더하기 기호 없이 문자열에 넣을 수 있게 되었다. 또한 백틱안에 이스케이프 문자()없이 작은 따옴표나 큰 따옴표도 사용이 가능
객체 리터럴
- old
var sayNode = function(){
    console.log('Node');
};

var es = 'ES';

var oldObject = {
    sayJS: function(){
        console.log('JS');
    },
    sayNode: sayNode,
};
oldObject[es+6] = 'Fantastic';

oldObject.sayNode(); // Node
oldObject.sayJS(); // JS
console.log(oldObject.ES6); // Fantastic
oldObject 객체에 동적으로 속성을 추가하고 있다.
- new
var sayNode = function(){
    console.log('Node');
};

var es = 'ES';

const newObject = {
    sayJS(){
        console.log('JS');
    },
    sayNode,
    [es+6]: 'Fantastic'
}

newObject.sayNode(); // Node
newObject.sayJS(); // JS
console.log(newObject.ES6); // Fantastic
oldObject와 newObject를 비교해서 보면 sayJS 같은 객체의 메서드에 함수를 연결할 때 콜론(:)과 function을 붙이지 않아도 된다. sayNode: sayNode처럼 속성명과 변수명이 겹치는 경우에는 한 번만 쓸 수 있게 되었다.
{ name: name, age: age} // ES5
{ name, age} // ES2015
위와 같은 경우에서는 코드의 중복을 피할 수 있어서 편리하다고 한다.
예전 문법에서는 ES6라는 속성명을 만들려면 객체 리터럴(oloObject)의 바깥에서 [es+6]를 해야 했다. ES2015에서는 객체 리터럴 안에 선언하여도 된다. (newObject안에서 [es+6]가 속성명으로 바로 사용되고 있다.
화살표 함수
화살표 함수가 추가되었고 기존의 function()도 그대로 사용 가능
function add1(x, y){
    return x+y;
}

const add2 = (x, y)=>{
    return x+y;
}

const add3 = (x,y) => x+y;

const add4 = (x,y) => (x+y);

function not1(x){
    return !x;
}

const not2 = (x) => !x;

console.log(add1(1,2)); // 3
console.log(add2(1,2)); // 3
console.log(add3(1,2)); // 3
console.log(add4(1,2)); // 3

console.log(not1(true)); // false
console.log(not2(true)); // false
add1 ~ add4는 모두 같은 기능을 하고, not1과 not2도 같은 기능을 한다.
function 키워드 대신 => 키워드로 함수를 선언한다.
return 문을 줄일 수 있다. add3과 add4 처럼 중괄호 없이 return할 식을 바로 적으면 된다. not2처럼 매개변수가 한 개면 매개변수를 소괄호로 묶어주지 않아도 된다.(묶어 줘도 된다.)
기존의 function과 다른 점은 this 바인딩 방식이다.
var relationship1 = {
    name: 'zero',
    friends: ['nero', 'hero', 'xero'],
    logFriends:
        function () {
            var that = this;
            this.friends.forEach(function (friend) {
                console.log(that.name, friend);
            });
        },
};

relationship1.logFriends();

const relationship2 = {
    name: 'zero',
    friends: ['nero', 'hero', 'xero'],
    logFriends(){
        this.friends.forEach(friend =>{
            console.log(this.name, friend);
        });
    }
}

relationship2.logFriends();
relationship1 에서는 this가 각자 다른 scope를 가지므로 that이라는 변수를 사용해 relationship1에 간접적으로 접근한다.
relationship2 에서는 화살표 함수를 사용하여 relationship2의 this를 그대로 사용한다. (상위 scope의 this를 그대로 물려 받는다.)
기본적으로는 화살표 함수를 쓰되, this를 사용해야 하는 경우에는 화살표 함수와 함수 선언문(function) 둘 중에 하나를 고르면 된다.
비구조화 할당
객체와 배열로부터 속성이나 요소를 쉽게 꺼낼 수 있다.
var candyMachine = {
status:{
name: 'node',
count: 5
},
getCandy: function(){
this.status.count--;
return this.status.count;
}
};
var getCandy = candyMachine.getCandy;
var count = candyMachine.status.count;
console.log(count);
객체의 속성을 같은 이름의 변수에 대입하는 코드이다. 아래와 같이 변경할 수 있다.
const candyMachine = {
status:{
name: 'node',
count: 5
},
getCandy(){
this.status.count--;
return this.status.count;
}
};

const {getCandy, status} = candyMachine;
console.log(getCandy);
console.log(status);
책에서는 const {getCandy, status:{candy}} 를 선언하여 candyMachine으로 초기화하지만, 에러가 난다.
배열의 비구조화
var array = ['nodejs', {}, 10, true];
var node = array[0];
var obj = array[1];
var bool = array[3];
위처럼 하나하나씩 선언하고, 배열의 각 원소를 대입하는 대신 아래와 같이 변경할 수 있다.
const array = ['nodejs', {}, 10, true];

const [node, obj, , bool]=array;

console.log(node); // nodejs
console.log(obj); // {}
console.log(bool); // true
프로미스(Promise)
javascript와 node에서는 주로 비동기 프로그래밍을 한다. 특히 이벤트 주도 방식 때문에 콜백(call back)함수를 자주 사용한다. ES2015부터는 자바스크립트와 노드의 API들이 콜백 대신 프로미스(Promise) 기반으로 재구성 된다.
프로미스 규칙
- 프로미스 객체 생성
const contition = true; // true면 resolve, false면 reject
const promise = new Promise((resolve, reject) => {
    if(condition){
        resolve('성공');
    }else{
        reject('실패');
    }
});

promise
.then((message) => {
    console.log(message); // 성공(resolve)한 경우 실행
})
.catch((error)=>{
    console.error(error); // 실패(reject)한 경우 실행
});
new Promise로 프로미스를 생성할 수 있으며, 안에 resoleve와 reject를 매개변수로 갖는 콜백 함수를 넣어준다. 이렇게 만든 promise 변수에 then과 catch 메서드를 붙일 수 있다. 프로미스 내부에서 resolve가 호출되면 then이 실행되고, reject가 호출되면 catch가 실행된다.
resolve와 reject에 넣어준 인자는 각각 then과 catch의 매개변수에서 받을 수 있다. 즉, resolve('성공')이 호출되면 then의 message가 '성공'이 되고, reject('실패')가 호출되면 catch의 error이 'tlfvo'가 된다. contition의 값을 false로 변경하면 catch에서 에러가 로깅(logging) 된다.
then이나 catch에서 다시 다른 then이나 catch를 붙일 수 있다. 이전 then의 return 값을 다음 then의 매개변수로 넘긴다. 프로미스를 return한 경우 프로미스가 수행된 후 다음 then이나 catch가 호출된다.
const condition = true; // true면 resolve, false면 reject
const promise = new Promise((resolve, reject) => {
    if(condition){
        resolve('성공');
    }else{
        reject('실패');
    }
});

promise
    .then((message)=>{
        return new Promise((resolve,reject)=>{
            resolve(message);
        });
    })
    .then((message2)=>{
        console.log(message2+2);
        return new Promise((resolve, reject)=>{
            resolve(message2);
        });
    })
    .then((message3)=>{
        console.log(message3+3);
    })
    .catch((error)=>{
        console.error(error);
    });
    //실행 결과 : 성공2 성공3
처음 then에서 message를 resolve하면 다음 then에서 받을 수 있다. 여기서 다시 message2를 resolve 했으므로 다음 then에서 message3를 받는다.
이것을 활용해 콜백을 프로미스로 바꿀 수 있다. 다음은 콜백에 쓰는 패턴 중 하나이다. 이를 프로미스로 변경한다.
function findAndSaveUser(Users){
    Users.findOne({}, (err, user) => { // 첫 번째 콜백
        if(err){
            return console.error(err);
        }
        user.name = 'zero';
        user.save((err)=>{ // 두 번째 콜백
            if(err){
                return console.error(err);
            }
            Users.findOne({gender:'m'}, (err, user) =>{ // 세 번째 콜백
                //생략
            });
        });
    });
}
콜백 함수가 총 세번 중첩되어 있다. 콜백 함수가 나올 때마다 코드의 깊이가 깊어진다. 그리고 각 콜백 함수마다 에러도 따로 처리해줘야 한다. 이 코드를 다음과 같이 변경할 수 있다.
function findAndSaveUser(Users){
    Users.findOne({})
        .then((user)=>{
            user.name = 'zero';
            return user.save();
        })
        .then((user)=>{
            return Users.findOne({ gender: 'm'});
        })
        .then((user)=>{
            //생략
        })
        .catch(err =>{
            console.error(err);
        });
}
코드의 깊이가 더 이상 깊어지지 않는다. then 메서드들은 순차적으로 실행된다. 콜백에서 매번 다로 처리해야 했던 에러도 마지막에 있는 catch에서 한번에 처리할 수 있다. 하지만 모든 콜백함수를 위와 같이 바꿀 수 있는 것은 아니다.
메서드가 프로미스 방식을 지원해야 한다. 예제의 코드는 findOne과 save메서드가 내부적으로 프로미스 객체를 가지고 있어서 가능한 것이다.
지원하지 않는 경우 프로미스로 바꿀 수 있는 방법은 3.5.6절 참고(추후 추가 예정)
마지막으로 프로미스 여러 개를 한번에 실행할 수 있는 방법이 있다. 기존의 콜백 패턴이었다면 콜백을 여러 번 중첩해서 사용해야 했을 것이다. 하지만 Promise.all을 활용하면 간단히 할 수 있다.
const promise1 = Promise.resolve('성공1');
const promise2 = Promise.resolve('성공2');

Promise.all([promise1, promise2])
    .then((result)=>{
        console.log(result); // ['성공1', '성공2']
    })
    .catch(err=>{
        console.log(err);
    });
Promise.resolve는 즉시 resolve 하는 프로미스를 만드는 방법이다. 비슷한 것으로 즉시 reject하는 Promise.reject도 있다.
프로미스가 여러 개 있을 때 Promise.all에 넣으면 모두 resolve될 때까지 기다렸다가 then으로 넘어간다. result 매개변수에 각각의 프로미스 결괏값이 배열로 들어 있다. Promise 중 하나라도 reject가 되면 catch로 넘어간다.
프로미스로 인해 콜백 지옥이 해결됨
async/await
노드 7.6 버전부터 지원되는 기능이며 Javascript 스펙은 ES2017이다.
위에서 사용한 프로미스 코드를 가져와서 살펴본다.
function findAndSaveUser(Users){
    Users.findOne({})
        .then((user)=>{
            user.name = 'zero';
            return user.save();
        })
        .then((user)=>{
            return Users.findOne({ gender: 'm'});
        })
        .then((user)=>{
            //생략
        })
        .catch(err =>{
            console.error(err);
        });
}
콜백보다 코드의 깊이가 깊지는 않지만 여전히 코드가 긴 편이라고 한다. asyncawait 문법을 사용하면 아래와 같이 변경이 가능하다.(async function이 추가됨)
async function findAndSaveUser(Users){
    let user = await Users.findOne({});
    user.name = 'zero';
    user = await user.save();
    user = await Users.findOne({ gender: 'm'});
    //생략
}
코드가 매우 짧아졌다. 함수 선언부에서 일반 함수 선언 대신에 async function으로 교체한 후, 프로미스 앞에 await을 붙였다. 이제 함수는 해당 프로미스가 resolve될 때까지 기다린 뒤 다음 로직으로 넘어간다. 예를 들어 await Users.findOne({})이 resolve 될 때까지 기다린 뒤, user 변수를 초기화 한다.
위의 코드는 에러 처리 부분이 없으므로 아래와 같이 추가가 필요하다.
async function findAndSaveUser(Users) {
    try {
        let user = await Users.findOne({});
        user.name = 'zero';
        user = await user.save();
        user = await Users.findOne({ gender: 'm' });
        //생략
    } catch(error){
        console.error(error);
    }
}
try/catch문으로 로직을 감싼다. 프로미스의 catch 메서드처럼 try/catch문의 catch가 에러를 처리한다.
화살표 함수도 async와 같이 사용할 수 있다.
const findAndSaveUser = async (Users)=>{
    try {
        let user = await Users.findOne({});
        user.name = 'zero';
        user = await user.save();
        user = await Users.findOne({ gender: 'm' });
        //생략
    } catch(error){
        console.error(error);
    }
};
for 문과 async/await을 같이 써서 Promise.all을 대체할 수도 있다. 노드 10부터 지원하는 ES2018 문법이다.
const promise1 = Promise.resolve('성공1');
const promise2 = Promise.resolve('성공2');
(async () =>{
    for await (promise of [promise1, promise2]){
        console.log(promise);
    }
})();
앞으로 중첩되는 콜백 함수가 있다면 프로미스를 거쳐 async/await 문법으로 바꾸는 연습을 하도록 하자.
@!#@!$!@#@#
아직 갈피를 못잡겠다. javascript 기초가 없어서 그런가... 일단 계속 진행한다...
'NodeJS' 카테고리의 다른 글
| [express] 미들웨어 종류와 실행 순서 (0) | 2020.09.23 |
|---|---|
| [NodeJS] nodejs 동기/비동기 테스트 (0) | 2020.09.16 |
| [NodeJS] nodejs 그림 불러오기 (4) | 2020.09.16 |
| [NodeJS] file system을 이용한 동적 페이지 생성 시 동작 방식 (0) | 2020.09.15 |
| 2장-알아두어야할 자바스크립트 (2-2 프런트엔드 자바스크립트) (0) | 2020.09.04 |


